記事内の外部リンクにはアフィリエイトリンクが含まれる場合があります。
Swiperとはなんぞやという方はこちらをご参照ください。
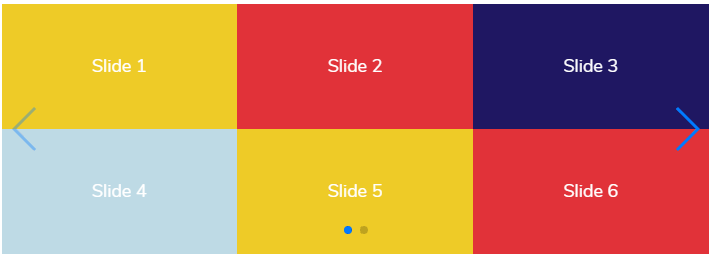
1. 列(縦方向)優先
fill: 'column'を指定した時、またはfillを省略した時は、

こういう並び順になります。
Sample.1
HTML
<!-- Swiper START -->
<div class="swiper">
	<!-- メイン表示部分 -->
	<div class="swiper-wrapper">
		<!-- 各スライド -->
		<div class="swiper-slide">Slide 1</div>
		<div class="swiper-slide">Slide 2</div>
		<div class="swiper-slide">Slide 3</div>
		<div class="swiper-slide">Slide 4</div>
	</div>
	<!-- 前ページボタン -->
	<div class="swiper-button-prev"></div>
	<!-- 次ページボタン -->
	<div class="swiper-button-next"></div>
	<!-- ページネーション -->
	<div class="swiper-pagination"></div>
</div>
<!-- Swiper END -->
JavaScript
const mySwiper = new Swiper('.swiper', {
	grid: {
		fill: 'column',
		rows: 2
	},
	slidesPerView: 3,
	slidesPerGroup: 6,
	navigation: {
		nextEl: '.swiper-button-next',
		prevEl: '.swiper-button-prev'
	},
	pagination: {
		el: '.swiper-pagination',
		type: 'bullets',
		clickable: true
	}
});slidesPerView: ◯ で「何列表示にするか」を指定、
slidesPerGroup: ◯ で「何枚を一度に動かすか」を指定。
slidesPerGroupの設定省略時は、一列ずつ動かします。
CSS
/* 全体のスタイル */
.swiper {
	width: 100%;
	height: 250px;
}
/* 全スライド共通スタイル */
.swiper-slide {
	color: #ffffff;
	width: 100%;
	height: 125px;
	text-align: center;
	line-height: 125px;
}
/* 4の倍数+1枚目のスライドのスタイル(1枚目、5枚目…) */
.swiper-slide:nth-child(4n+1) {
	background-color: #EECB27;
}
/* 4の倍数+2枚目のスライドのスタイル(2枚目、6枚目…) */
.swiper-slide:nth-child(4n+2) {
	background-color: #E13239;
}
/* 4の倍数+3枚目のスライドのスタイル(3枚目、7枚目…) */
.swiper-slide:nth-child(4n+3) {
	background-color: #1F1762;
}
/* 4の倍数+4枚目のスライドのスタイル(4枚目、8枚目…) */
.swiper-slide:nth-child(4n+4) {
	background-color: #BEDAE5;
}
※別途ライブラリの読み込みが必要です。
わからない方は基礎編参照
2. 行(横方向)優先
slidesPerColumnFill: 'row'を指定した時は、

こういう並び順。
Sample.2
JavaScript
const mySwiper = new Swiper('.swiper', {
	grid: {
		fill: 'row',
		rows: 2
	},
	slidesPerView: 3,
	slidesPerGroup: 6,
	navigation: {
		nextEl: '.swiper-button-next',
		prevEl: '.swiper-button-prev'
	},
	pagination: {
		el: '.swiper-pagination',
		type: 'bullets',
		clickable: true
	}
});3. 行(横方向)優先で折り返したい
本題。

こうしたい時はどうすればいいか?です。
方法1. display: flexやgridやinline-blockを使って、1枚のスライドに複数のブロック要素を入れる
display: gridを使った場合。
Sample.3-1
HTML
<!-- Swiper START -->
<div class="swiper">
	<!-- メイン表示部分 -->
	<div class="swiper-wrapper">
		<!-- 各スライド -->
		<div class="swiper-slide">
			<div>Slide 1</div>
			<div>Slide 2</div>
			<div>Slide 3</div>
			<div>Slide 4</div>
			<div>Slide 5</div>
			<div>Slide 6</div>
		</div>
		<div class="swiper-slide">
			<div>Slide 7</div>
			<div>Slide 8</div>
			<div>Slide 9</div>
			<div>Slide 10</div>
			<div>Slide 11</div>
			<div>Slide 12</div>
		</div>
	</div>
	<!-- 前ページボタン -->
	<div class="swiper-button-prev"></div>
	<!-- 次ページボタン -->
	<div class="swiper-button-next"></div>
	<!-- ページネーション -->
	<div class="swiper-pagination"></div>
</div>
<!-- Swiper END -->
JavaScript
const mySwiper = new Swiper('.swiper', {
	navigation: {
		nextEl: '.swiper-button-next',
		prevEl: '.swiper-button-prev'
	},
	pagination: {
		el: '.swiper-pagination',
		type: 'bullets',
		clickable: true
	}
});
CSS
/* 全体のスタイル */
.swiper {
	width: 100%;
	height: 250px;
}
/* スライド(大)の設定 */
.swiper-slide {
	display: grid;
	grid-template-rows: 50% 50%;
	grid-template-columns: 33.3% 33.3% 33.3%;
	height: 250px;
}
/* スライド(小)の設定 */
.swiper-slide div {
	line-height: 125px;
	color: #ffffff;
}
/* 以下、背景色指定 */
.swiper-slide div:nth-child(4n+1) {
	background-color: #EECB27;
}
.swiper-slide div:nth-child(4n+2) {
	background-color: #E13239;
}
.swiper-slide div:nth-child(4n+3) {
	background-color: #1F1762;
}
.swiper-slide div:nth-child(4n+4) {
	background-color: #BEDAE5;
}flex、inline-blockの場合もCSSの書き方が違うだけ。
display: flexの場合。
Sample.3-2
CSS
/* 全体のスタイル */
.swiper-wrapper {
	width: 100%;
	height: 250px;
}
/* スライド(大)の設定 */
.swiper-slide {
	display: flex;
	flex-wrap: wrap;
	height: 250px;
}
/* スライド(小)の設定 */
.swiper-slide div {
	flex-basis: 33.3%;
	flex-grow: 1;
	line-height: 125px;
	color: #ffffff;
}
/* 以下、背景色指定 */
.swiper-slide div:nth-child(4n+1) {
	background-color: #EECB27;
}
.swiper-slide div:nth-child(4n+2) {
	background-color: #E13239;
}
.swiper-slide div:nth-child(4n+3) {
	background-color: #1F1762;
}
.swiper-slide div:nth-child(4n+4) {
	background-color: #BEDAE5;
}display: inline-blockの場合。
Sample.3-3
CSS
/* 全体のスタイル */
.swiper-wrapper {
	width: 100%;
	height: 250px;
}
/* スライド(大)の設定 */
.swiper-slide {
	letter-spacing: -0.5em;	/* 並べた時の余白消し */
	height: 250px;
}
/* スライド(小)の設定 */
.swiper-slide div {
	letter-spacing: normal;
	display: inline-block;
	width: 33.3%;
	height: 125px;
	line-height: 125px;
	color: #ffffff;
}
/* 以下、背景色指定 */
.swiper-slide div:nth-child(4n+1) {
	background-color: #EECB27;
}
.swiper-slide div:nth-child(4n+2) {
	background-color: #E13239;
}
.swiper-slide div:nth-child(4n+3) {
	background-color: #1F1762;
}
.swiper-slide div:nth-child(4n+4) {
	background-color: #BEDAE5;
}スライド数が決まっていて、あまり数が多くない場合は方法1が簡単です。
方法2. Swiperを入れ子にする
Swiperは入れ子にできます。
これを利用して、1行表示の親Swiperの中に複数行表示の子Swiperを配置するという方法です。
子Swiperは1回で表示できるスライド数のみで作成します。
1回だけの表示であればfill: 'row'指定で折り返しているように見えます。
Sample.3-4
HTML
<!-- 親Swiper START -->
<div class="swiper swiper-parent">
	<!-- メイン表示部分 -->
	<div class="swiper-wrapper">
		<!-- スライド1 -->
		<div class="swiper-slide">
			<!-- 子Swiper START -->
			<div class="swiper swiper-child">
				<div class="swiper-wrapper">
					<div class="swiper-slide">Slide 1</div>
					<div class="swiper-slide">Slide 2</div>
					<div class="swiper-slide">Slide 3</div>
					<div class="swiper-slide">Slide 4</div>
					<div class="swiper-slide">Slide 5</div>
					<div class="swiper-slide">Slide 6</div>
				</div>
			</div>
			<!-- 子Swiper END -->
		</div>
		<!-- スライド2 -->
		<div class="swiper-slide">
			<!-- 子Swiper START -->
			<div class="swiper swiper-child">
				<div class="swiper-wrapper">
					<div class="swiper-slide">Slide 7</div>
					<div class="swiper-slide">Slide 8</div>
					<div class="swiper-slide">Slide 9</div>
					<div class="swiper-slide">Slide 10</div>
					<div class="swiper-slide">Slide 11</div>
					<div class="swiper-slide">Slide 12</div>
				</div>
			</div>
			<!-- 子Swiper END -->
		</div>
	</div>
	<!-- 前ページボタン -->
	<div class="swiper-button-prev"></div>
	<!-- 次ページボタン -->
	<div class="swiper-button-next"></div>
	<!-- ページネーション -->
	<div class="swiper-pagination"></div>
</div>
<!-- Swiper END -->
JavaScript
//親Swiper
const mySwiperp = new Swiper('.swiper-parent', {
	navigation: {
		nextEl: '.swiper-button-next',
		prevEl: '.swiper-button-prev'
	},
	pagination: {
		el: '.swiper-pagination',
		type: 'bullets',
		clickable: true
	}
});
//子Swiper
const mySwiperc = new Swiper('.swiper-child', {
	nested: true,
	grid: {
		fill: 'row',
		rows: 2
	},
	slidesPerView: 3,
	slidesPerGroup: 6
});
パラメータ解説
| パラメータ | 取り得る値 (省略時は赤字) | 備考 |
|---|---|---|
| nested | true | 入れ子のSwiperからタッチイベントを正常に取得する(※親子で同じ方向に移動する場合のみ使用) |
| false | 上記を考慮しない |
CSS
/* 全体のスタイル */
.swiper {
	width: 100%;
	height: 250px;
}
/* 親Swiperのスライドの設定 */
.swiper-parent .swiper-slide {
	height: 250px;
}
/* 子Swiperのスライドの設定 */
.swiper-child .swiper-slide {
	height: 125px;
	line-height: 125px;
	color: #ffffff;
}
/* 以下、背景色指定 */
.swiper-child .swiper-slide:nth-child(4n+1) {
	background-color: #EECB27;
}
.swiper-child .swiper-slide:nth-child(4n+2) {
	background-color: #E13239;
}
.swiper-child .swiper-slide:nth-child(4n+3) {
	background-color: #1F1762;
}
.swiper-child .swiper-slide:nth-child(4n+4) {
	background-color: #BEDAE5;
}
子Swiperにそれぞれまったく異なる設定を与えてみてもおもしろいです。
まあでも、方法1も方法2も「自分で分割しないといけない」というのがネックではあります。
それで次の方法。
4. 行(横方向)優先で折り返しつつ、画面幅によってレイアウトも変えたい
上記の応用。
入れ子方式で、画面幅によるレイアウト切り替えも併用する方法を考えてみました。
まずサンプル。
Sample.4
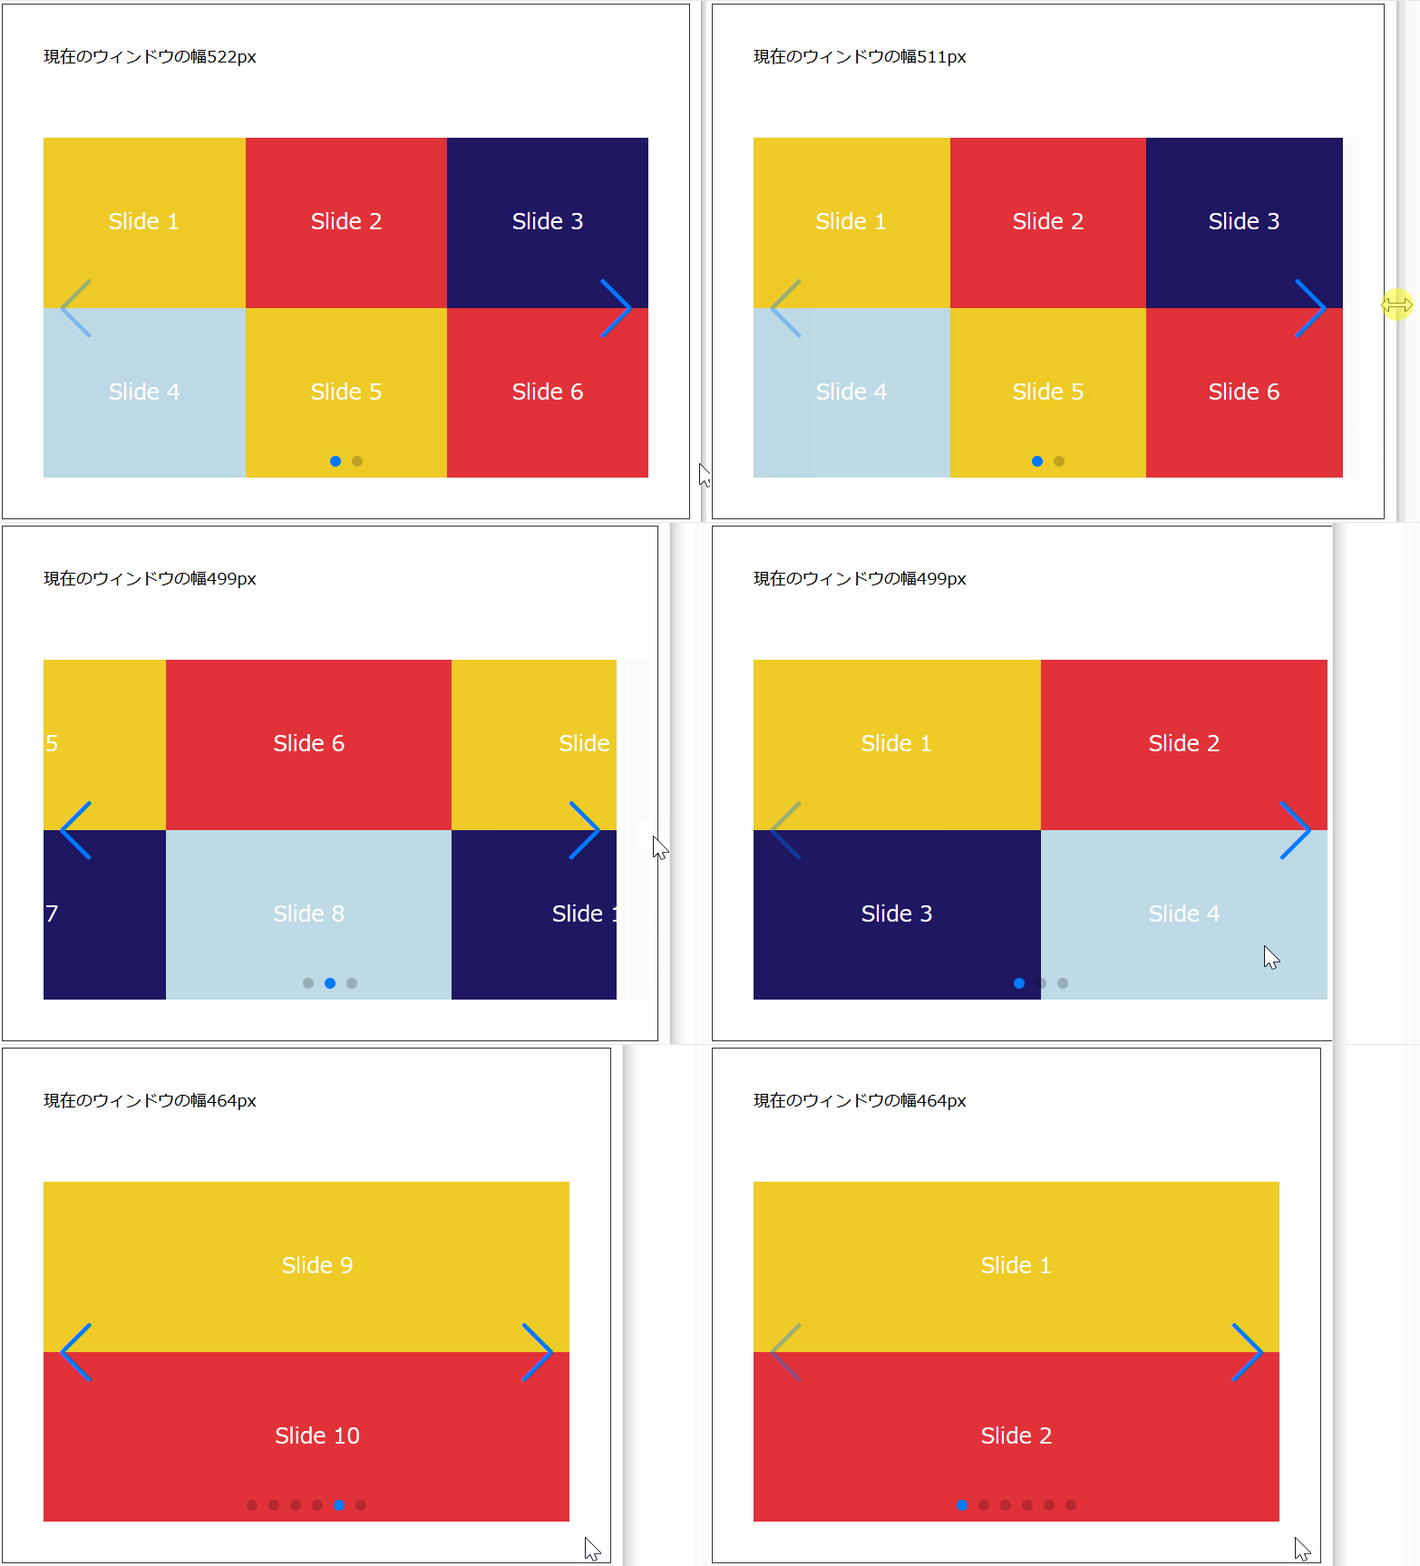
スライドの順番を保ちつつ、画面幅によってレイアウトを切り替えます。
ついでにあらかじめ自分で分割しておく必要なし!
コードはこちら。
※CSSはSample.3-4と同じ
HTML
<!-- 親Swiper START -->
<div class="swiper swiper-parent">
	<!-- メイン表示部分 -->
	<div class="swiper-wrapper">
		<!-- スライド1 -->
		<div class="swiper-slide">
			<!-- 子Swiper START -->
			<div class="swiper swiper-child">
				<div class="swiper-wrapper">
					<div class="swiper-slide">Slide 1</div>
					<div class="swiper-slide">Slide 2</div>
					<div class="swiper-slide">Slide 3</div>
					<div class="swiper-slide">Slide 4</div>
					<div class="swiper-slide">Slide 5</div>
					<div class="swiper-slide">Slide 6</div>
					<div class="swiper-slide">Slide 7</div>
					<div class="swiper-slide">Slide 8</div>
					<div class="swiper-slide">Slide 9</div>
					<div class="swiper-slide">Slide 10</div>
					<div class="swiper-slide">Slide 11</div>
					<div class="swiper-slide">Slide 12</div>
				</div>
			</div>
			<!-- 子Swiper END -->
		</div>
	</div>
	<!-- 前ページボタン -->
	<div class="swiper-button-prev"></div>
	<!-- 次ページボタン -->
	<div class="swiper-button-next"></div>
	<!-- ページネーション -->
	<div class="swiper-pagination"></div>
</div>
<!-- Swiper END -->jQuery
//ウィンドウがリサイズされた時の処理
$(window).resize(function(){
	var w = $(window).width();
	makeSwiper(w);
});

//ページが読み込まれた時の処理
$(function(){
	var w = $(window).width();
	makeSwiper(w);
});

//Swiper作成
function makeSwiper(w) {

	//画面サイズによる切り分け(一度に何枚表示するか)
	var per;
	if (w >= 500) {
		//画面幅500~
		per = 6;
	} else if (w >= 480) {
		//画面幅480~499
		per = 4;
	} else {
		//上記以外(画面幅~479)
		per = 2;
	}

	//親のスライド数取得
	var parenttotal = $('.swiper-parent  > .swiper-wrapper > .swiper-slide').length;

	//すでに親のスライド数が2枚以上の時(初回作成済の場合)は初期状態に戻す
	if (parenttotal > 1) {
		$('.swiper').each(function(){
			//全Swiper削除
			this.swiper.destroy();
		});

		//☆親のスライドを1枚に戻す
		for (var i = parenttotal - 1; i >= 1; i--) {
			//一番最後の親スライドの内容を、1枚前の親スライドにコピー
			$('.swiper-parent > .swiper-wrapper > .swiper-slide:eq(' + (i - 1) +') > .swiper-child > .swiper-wrapper > .swiper-slide:last').after($('.swiper-parent > .swiper-wrapper > .swiper-slide:eq(' + i +') > .swiper-child > .swiper-wrapper').html());
			//一番最後の親スライドを消去
			$('.swiper-parent > .swiper-wrapper > .swiper-slide:eq(' + i +')').remove();
		}
	}

	//子のスライド数取得
	var total =  $('.swiper-child .swiper-slide').length;

	//★親スライド複製と子スライドの分割
	for (var j = 0; j < (total / per); j++) {
		if (j < (total / per) - 1) {
			//親スライドを1枚複製して最後に追加
			$('.swiper-parent > .swiper-wrapper > .swiper-slide:last').after($('.swiper-parent > .swiper-wrapper > .swiper-slide:last').clone());
		}
		var over = (j + 1) * per - 1;
		var under = j * per;
		//子の不要なスライドを削除する
		$('.swiper-child:eq(' + j + ') .swiper-slide:gt(' + over + ')').remove();
		$('.swiper-child:eq(' + j + ') .swiper-slide:lt(' + under + ')').remove();
	}

	const mySwiperp = new Swiper('.swiper-parent', {
		keyboard: true,
		navigation: {
			nextEl: '.swiper-button-next',
			prevEl: '.swiper-button-prev'
		},
		pagination: {
			el: '.swiper-pagination',
			type: 'bullets',
			clickable: true
		}
	});
	const mySwiperc = new Swiper('.swiper-child', {
		nested: true,
		grid: {
			fill: 'row',
			rows: 2
		},
		slidesPerView: 1,
		slidesPerGroup: 2,
		breakpoints: {
			500: {
				slidesPerView: 3,
				slidesPerGroup: 6
			},
			480: {
				slidesPerView: 2,
				slidesPerGroup: 4
			}
		}
	});
}別途jQueryライブラリの読み込み要。
HTML
<script src="http://code.jquery.com/jquery-3.3.1.min.js"></script>気になる方はJavaScriptに書き換えて下さい。
★では、子スライドが全部入った親スライド1枚目を必要な分だけ複製して、親スライドそれぞれから不要な子スライドを削除するということをやっています。
例えば、上記のサンプルで4枚ずつ表示している場合は、
| 親1枚目 | 親2枚目 | 親3枚目 | ||
| 1 | 初期状態 | 子1~12 | - | - |
| 2 | 親1を複製して親2を作る | 子1~12 | 子1~12 | - |
| 2 | 親1の不要な子を削除 | 子1~4 | 子1~12 | - |
| 2 | 親2を複製して親3を作る | 子1~4 | 子1~12 | 子1~12 |
| 2 | 親2の不要な子を削除 | 子1~4 | 子5~8 | 子1~12 |
| 2 | 親3の不要な子を削除 | 子1~4 | 子5~8 | 子9~12 |
再作成する場合(リサイズ時)は、上記処理を逆にしたすべての子を親1に入れるという処理(☆部分)を行ってから再度★の処理でスライドを作り直しています。
リサイズするたびに処理が走るので、ちまちまリサイズした場合は負荷が高いです…。
5. おまけ:Swiperの再作成について
上のサンプルでdestroy()というSwiperの固有メソッドを使っています。
これはSwiperを削除するメソッド。
これを応用して、こんなものを作ってみました。
Sample.5
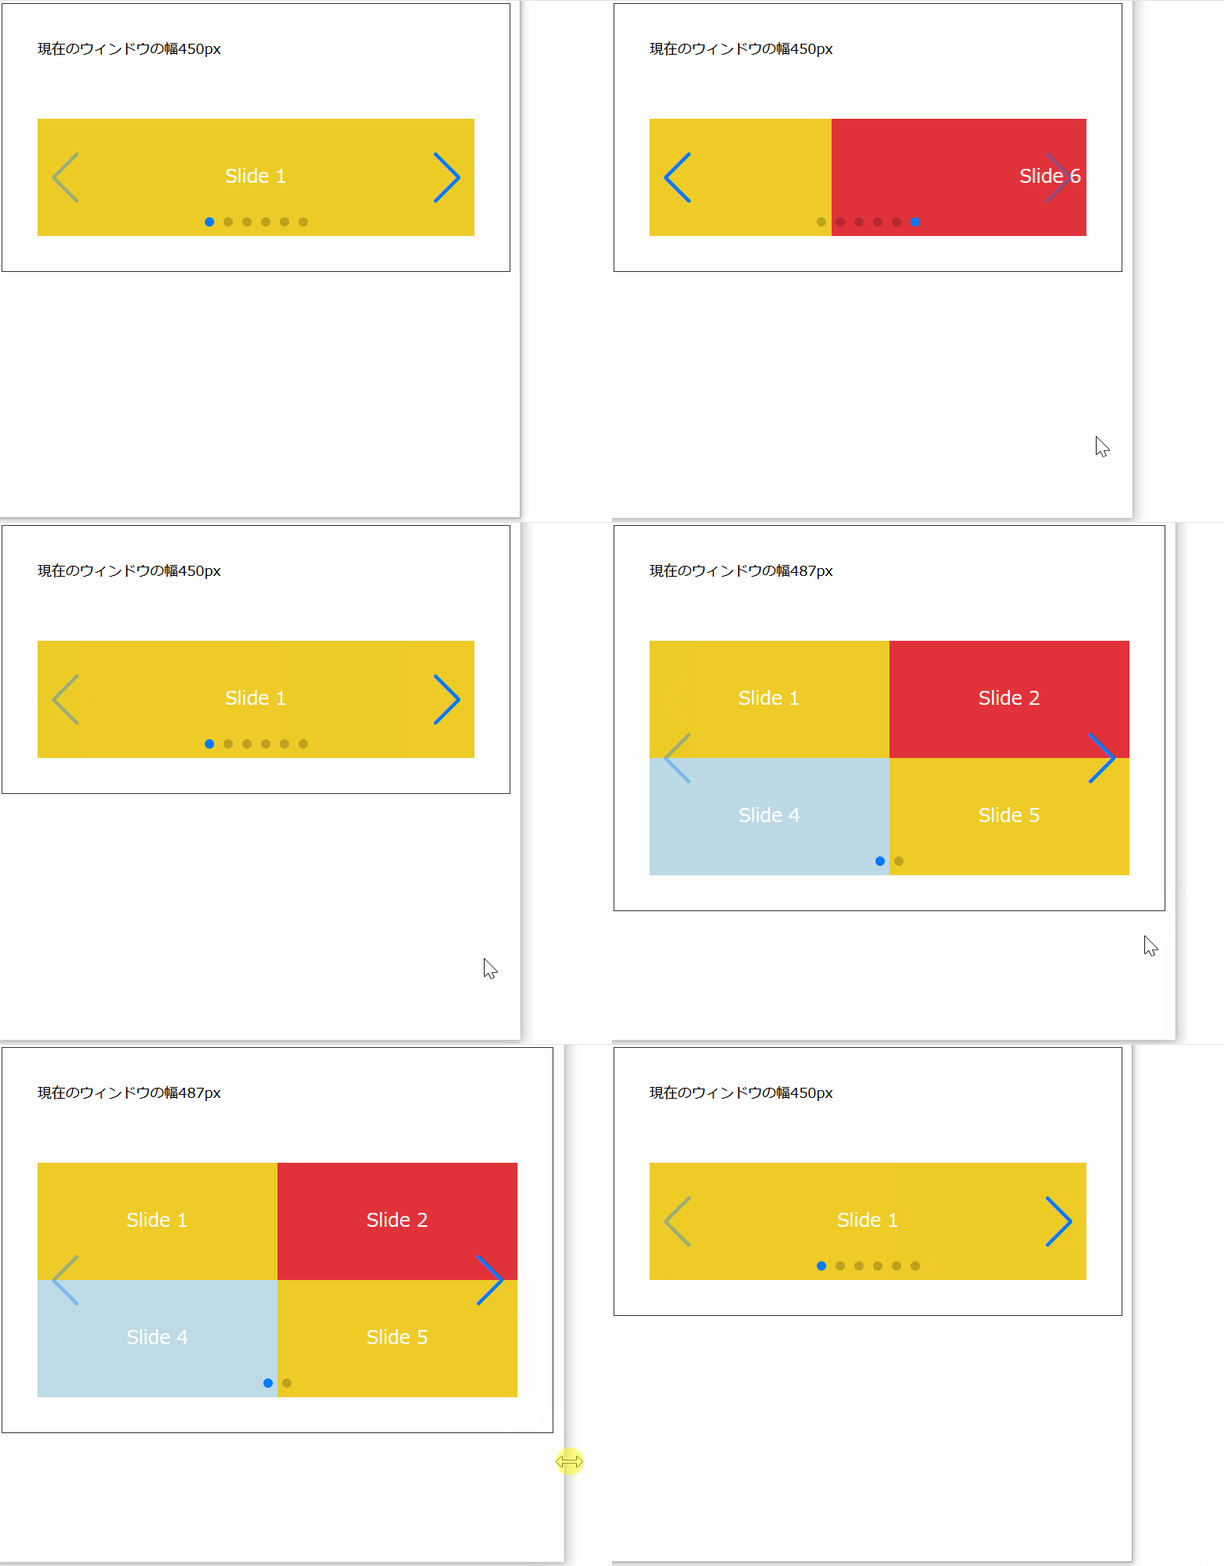
画面幅480未満は1行表示のSwiper、画面幅480~499は2行表示のSwiper、画面幅500~はSwiperを使わず、スライドをすべて並べて表示しています。
HTML
<!-- Swiper START -->
<div class="swiper">
	<!-- メイン表示部分 -->
	<div class="swiper-wrapper">
		<!-- 各スライド -->
		<div class="swiper-slide">Slide 1</div>
		<div class="swiper-slide">Slide 2</div>
		<div class="swiper-slide">Slide 3</div>
		<div class="swiper-slide">Slide 4</div>
		<div class="swiper-slide">Slide 5</div>
		<div class="swiper-slide">Slide 6</div>
	</div>
	<!-- 前ページボタン -->
	<div class="swiper-button-prev"></div>
	<!-- 次ページボタン -->
	<div class="swiper-button-next"></div>
	<!-- ページネーション -->
	<div class="swiper-pagination"></div>
</div>
<!-- Swiper END -->jQuery
var destroyed = true;
$(window).resize(function(){
	$('.swiper').each(function(){
		if (destroyed == false) {	//Swiperが存在しているときだけ削除処理を行う
			this.swiper.destroy();
			destroyed = true;
		}
	});
	var w = $(window).width();
	makeSwiper(w);
});
$(function(){
	var w = $(window).width();
	makeSwiper(w);
});

function makeSwiper(w) {

	//画面サイズによる切り分け
	if (w >= 500) {
		//画面幅500~
		$('.swiper-wrapper').removeAttr('style');
		$('.swiper-slide').removeAttr('style');
	} else if (w >= 480) {
		//画面幅481~499
		const mySwiper = new Swiper('.swiper', {
			watchOverflow: false,
			grid: {
				fill: 'column',
				rows: 2
			},
			slidesPerView: 3,
			keyboard: true,
			navigation: {
				nextEl: '.swiper-button-next',
				prevEl: '.swiper-button-prev'
			},
			pagination: {
				el: '.swiper-pagination',
				type: 'bullets',
				clickable: true
			}
		});
		destroyed = false;
	} else {
		//上記以外(画面幅~479)
		const mySwiper = new Swiper('.swiper', {
			keyboard: true,
			navigation: {
				nextEl: '.swiper-button-next',
				prevEl: '.swiper-button-prev'
			},
			pagination: {
				el: '.swiper-pagination',
				type: 'bullets',
				clickable: true
			}
		});
		destroyed = false;
	}
}あ、あとついでに1つSwiperのパラメータ解説も。
パラメータ解説
| パラメータ | 取り得る値 (省略時は赤字) | 備考 |
|---|---|---|
| watchOverflow | true | 前・次スライドがない時(全一枚の時)、自動で前・次ボタン、ページネーションなどを非表示にする |
| false | 前・次スライドがなくてもナビゲーションを表示する |
サンプルではSwiperであることをわかりやすくするためにwatchOverflow: falseにしていますが、trueにすると各種ナビゲーションが非表示になります。
CSS
/* Swiper全体の大きさ */
.swiper {
	width: 100%;
	height: 100px;
}
/* スライドの共通スタイル */
.swiper-slide {
	width: 100%;
	text-align: center;
	height: 100px;
	line-height: 100px;
	color: #ffffff;
}
/* 背景色設定 */
.swiper-slide:nth-child(4n+1) {
	background-color: #EECB27;	/* 1枚目、5枚目… */
}
.swiper-slide:nth-child(4n+2) {
	background-color: #E13239;	/* 2枚目、6枚目… */
}
.swiper-slide:nth-child(4n+3) {
	background-color: #1F1762;	/* 3枚目、7枚目… */
}
.swiper-slide:nth-child(4n+4) {
	background-color: #BEDAE5;	/* 4枚目、8枚目… */
}

/* 画面幅480px~の場合 */
@media screen and (min-width:480px) {
	.swiper {
		height: 200px;	/* 全体の高さを変更 */
	}
}

/* 画面幅500px~の場合 */
@media screen and (min-width:500px) {
	.swiper {
		height: auto;	/* 高さを固定しない(子要素に合わせて伸ばす) */
		overflow: visible;
	}
	.swiper-wrapper {
		display: flex;	/* 並べて表示 */
		flex-wrap: wrap;
		height: auto;	/* 高さを固定しない(子要素に合わせて伸ばす) */
	}
	.swiper-slide {
		flex-basis: 50%;	/* スライド1枚あたりの幅 */
	}
	.swiper-button-prev, .swiper-button-next, .swiper-pagination {
		display: none;	/* 前・次ページボタン、ページネーション非表示 */
	}
}
画面幅が狭いときだけスライダーにするっていうのはなかなか使い道がありそうですね。
Wordpressのテーマなどにも使えそうです。


